For financial reasons, some clients will purchase publicly signed certificates for Expressway Edge but have the Expressway Core certificates signed by their internal (usually Microsoft) CA. The entire chain, the internal Microsoft signed server certificate, intermediate MS certificate and root MS certificate must be installed on Expressway Core, the same requirement as if it's a public CA. Then, because Expressway Edge and CUCM both need to trust Expressway Core but by default neither know anything about your internal certificate authority, you need to install the internally signed MS CA certificates there as well. The MS CA intermediate certificate and root certificate need to be installed on CUCM as tomcat-trust certificates. The MS CA intermediate certificate and root certificate need to be installed on Expressway Edge under Trusted CA certificate. Expressway Core will need to be rebooted after uploading certificates, and Cisco Tomcat will need to be restarted on CUCM to make them usable.
==========
Q1: The "Cisco TelePresence VCS Certificate Creation and Use Deployment Guide Cisco VCS X8.2" indicates when generating the CSR on Expressway Core for MRA, you need to include the FQDNs of all the CUCM phone security profile names. Given the phone security profiles are typically in the format of "Cisco 7841 - Standard SIP Non-Secure Profile", what would be the FQDN of this profile?
A1: The answer is actually in the "Unified Communications Mobile and Remote Access via Cisco VCS Deployment Guide Cisco VCS X8.2", not the certificate guide.
“The Phone Security Profiles in Unified CM (System > Security > Phone Security Profile ) that are configured for TLS and are used for devices requiring remote access must have a name in the form of an FQDN that includes the enterprise domain, for example jabber.secure.example.com. (This is because those names must be present in the list of Subject Alternate Names in the VCS Control's server certificate.)”
So, instead of adding a profile called “Standard Secure EX90 Profile”, you need to add a profile called EX90.secure.example.com and add each of those profile FQDNs to the CSR on Expressway Core.
==========
Q2: In a working MRA (Mobile Remote Access) environment, you upload new certificates signed by a public CA / certificate authority to both your VCS / Expressway Edge and Core. The MRA (Mobile Remote Access) Traversal Zone looks good on both VCS / Expressway servers but your remote Jabber clients return a "cannot communicate with the server" message. Checking the VCS logs, you find errors like this:
2014-12-31T12:42:12-05:00
portforwarding: Level="ERROR" Detail="Client control socket open failed" forwarding="localhost:8191:localhost:8192" host="expressway-edge1.mydomainname.com" id="59XXXXXX-9XXXX-1XXX-9XXX-0010XXXXXXXX" retcode="255" err="ssh_x509store_cb: subject='OU=Domain Control Validated,OU=COMODO SSL Unified Communications,CN=expressway-edge1.mydomainname.com', error 20 at 0 depth lookup:unable to get local issuer certificate
ssh_verify_cert: verify error, code=20, msg='unable to get local issuer certificate'
key_verify failed for server_host_key
" UTCTime="2014-12-31 17:42:12,345"
A2: The issue is when you receive the new certificate for the server and install it, you should / need to install the entire certificate chain your CA provided. This includes the trusted CA root certs. As an example, here where we used a certificate signed by Comodo, there were three other root and intermediate certificates supplied by Comodo that need to be installed as well. They also need to be installed on both the Edge and Core servers. Do not assume that since you already see your CA name on the VCSs' trusted lists that new certificates issued for the servers will work.
==========
Q3: You installed a publicly signed certificate on both the Expressway Edge and Core servers but MRA (Mobile Remote Access) users are still being challenged to accept certificates. What do you look for?
A3: From the "Cisco Expressway Certificate Creation and Use Deployment Guide" (note: this guide appears to be updated regularly with new information):
For Mobile and remote access deployments, the Expressway-C server certificate needs to include all the Unified CM phone security profile names, and all the IM and Presence chat node aliases. The Expressway-E server certificate needs to include all the Unified CM registrations domains, the XMPP federation domains and the IM and Presence chat node aliases.
Also note, the the Unified CM registrations domains need to be preceded with a "collab-edge". So... if your CUCM domain is mydomain.com, you need to include an entry in the CSR that loks like collab-edge.mydomain.com. Since this doesn't seem to make sense, you might try to use the SRV name format of _collab-edge._tls.mydomain.com when generating the CSR. The current Expressway-E server has an option for this, makes total sense, but you'll likely find your CA doesn't support that name format. Don't bother. Use the DNS format with just the collab-edge prefix.
Tuesday, December 23, 2014
Tuesday, November 04, 2014
Cisco AnyConnect Secure Mobility Client list of networks drop down
Using the Cisco AnyConnect Secure Mobility Client vesion 3.1.04066, I found the first network you connect to is the only network that is automatically retained in the VPN drop down list. I regularly need to connect to dozens of networks to provide support, so being able to populate that list and refer to it later is very helpful.
The older Cisco VPN Client allowed for a pretty simple method to add or import profiles. Each network profile was stored in a seperate PCF file. This would allow you to maintain a list of locations / networks in the client that you could connect to simply by choosing one on a list.
The newer Cisco AnyConnect Secure Mobility Client doesn't use provide the same method to create or maintain a list of networks. There is a drop down list though, so how does a user populate it?
On a Windows 7 machine you will find a single XML file in the C:\ProgramData\Cisco\Cisco AnyConnect Secure Mobility Client\Profile folder. The one on my machine is called AnyConnect_Essentials_client_profile.xml.
In that file you will find a section that looks something like:
<ServerList>
<HostEntry>
<HostName>vpn.thefirstcompanyiconnectedto.com</HostName>
<HostAddress>vpn.thefirstcompanyiconnectedto.com</HostAddress>
</HostEntry>
</ServerList>
I found that if you simply add a second HostEntry section, the VPN client drop down list will include the second network you want to connect to.
<ServerList>
<HostEntry>
<HostName>vpn.thefirstcompanyiconnectedto.com</HostName>
<HostAddress>vpn.thefirstcompanyiconnectedto.com</HostAddress>
</HostEntry>
<HostEntry>
<HostName>vpn.iaddedthismanually.com</HostName>
<HostAddress>vpn.iaddedthismanually.com</HostAddress>
</HostEntry>
</ServerList>
Choose you entry from the list, click connect and Ta-Da!
Friday, October 24, 2014
CUCM to Nortel PBX secret sauce ingredient
interface Serial0/0/0:23
isdn channel-id invert extend-bit
isdn channel-id invert extend-bit
Sunday, September 21, 2014
Cisco CIMC - The maximum number of user sessions has been reached
I somehow ran into a "The maximum number of user sessions has been reached" error when working on a new Cisco BE6000 / UCS C220 chassis install. I had previously updated all the chassis software using the Host Upgrade Utility so I imagine it may have somehow been just me.
To fix things you can SSH to the CIMC address and run:
show user-session
To change to a particular session from the resulting list, note the session index numbers from the user-session list and run:
scope user-session sessionindex
To end the session you just switched to, run:
terminate
To exit the scope of that session, run:
exit
Thursday, September 04, 2014
Cisco 8900 9900 slow response time and Simplified New Call UI
We
recognized a bizarre issue during post-implementation support recently. All 8961 series phones were very sluggish and they
couldn’t keep up with the receptionists' fast fingers. After investigation
/ research, we saw that “Simplified New Call UI” was set to “Disabled” on the
root of the phone configuration. The purpose of this feature is described
below. This was introduced in CUCM 9.x and carries through to the present
Collaboration System Release. After enabling the Simplified New Call UI”
on all 8961s in the environment, response time was much faster. Note that the same applies to the 9951 and 9971 series phones as
well. Cisco Bug Tracker appears to indicate there are several related and open issues with the current firmware.
Simplified New
Call Bubble
The Simplified New Call Bubble
feature provides a simplified window for the user to place an off-hook call.
The administrator enables or disables the feature in the Phone Configuration
window using the Simplified New Call UI field. By default, the feature is
disabled.
When the user
start dialing a call with the Simplified New Call Window, the phone does not
display possible phone number matches from the call history.
The feature is
supported on the following SIP phones:

Monday, August 11, 2014
MyDisneyPhotoPass.com Disney PhotoPass downloaded images on your PC
If you visit any of the Disney parks, at least in the USA, you have the opportunity to have your photos taken at interesting locations around the park by Disney's professional photographers. This is a nice service, as you don't need to worry about finding someone to take your photo if your tired of the "selfie" look, they take multiple photos with good cameras so you will certainly find one you like, and you don't have to waste your time or energy taking photos when you should be enjoying the park.
When you are done with your visit, you can visit MyDisneyPhotoPass.com to review your photos and purchase the ones you like. You can pick various print sizes and finishes, and even apply some fun effects.
For those of you interested in how their website works, here's a little information on how to find the photos you review on your local Windows PC. These cached photos left behind from the website are likely no where as good as the ones you purchase, so I suggest you really just purchase them. Disney provides a great vacation experience and the photographers a valuable service.
Here I'm using Mozilla's Firefox browser version 31.0 and Microsoft Windows 7.
1. Log into http://mydisneyphotopass.com or https://mydisneyphotopass.disney.go.com/ like usual.
2. Navigate to the page where you can download your photos.

3. In the Firefox menu bar, click the Menu icon (looks like three horizontal bars)
4. Then choose Options.
5. Then choose the Advanced button.
6. Then choose the Network tab.
7. Under Cached Web Content, click Clear Now button

8. Click OK to close the options form.
9. Click some photos that interest you and make them as large as possible.

10. Open a new tab in Firefox, enter about:cache?device=disk in the address bar and hit Enter.

11. Click one of the links with the larger data sizes.

12. The path next to file on disk: i.e. C:\Users\rmaslanka\AppData\Local\Mozilla\Firefox\Profiles\rfsuwz4l.default\Cache\0\D6\EE8A1d01 is where one of the photos you previewed is stored on your PC.
13. To prove it, open a new tab in Firefox and paste that path in the address bar. You should see just the photo, outside of the Disney website.

When you are done with your visit, you can visit MyDisneyPhotoPass.com to review your photos and purchase the ones you like. You can pick various print sizes and finishes, and even apply some fun effects.
For those of you interested in how their website works, here's a little information on how to find the photos you review on your local Windows PC. These cached photos left behind from the website are likely no where as good as the ones you purchase, so I suggest you really just purchase them. Disney provides a great vacation experience and the photographers a valuable service.
Here I'm using Mozilla's Firefox browser version 31.0 and Microsoft Windows 7.
1. Log into http://mydisneyphotopass.com or https://mydisneyphotopass.disney.go.com/ like usual.
2. Navigate to the page where you can download your photos.
3. In the Firefox menu bar, click the Menu icon (looks like three horizontal bars)
4. Then choose Options.
5. Then choose the Advanced button.
6. Then choose the Network tab.
7. Under Cached Web Content, click Clear Now button
8. Click OK to close the options form.
9. Click some photos that interest you and make them as large as possible.
10. Open a new tab in Firefox, enter about:cache?device=disk in the address bar and hit Enter.
11. Click one of the links with the larger data sizes.
12. The path next to file on disk: i.e. C:\Users\rmaslanka\AppData\Local\Mozilla\Firefox\Profiles\rfsuwz4l.default\Cache\0\D6\EE8A1d01 is where one of the photos you previewed is stored on your PC.
13. To prove it, open a new tab in Firefox and paste that path in the address bar. You should see just the photo, outside of the Disney website.
14. If you want, you can right click the picture, choose Save Image As and choose a file name and location to save the image somewhere else.
Tuesday, July 22, 2014
Cisco Jabber using BAT Bulk Administration to add devices
Add Devices
If you have CUWL licensing, you can add Jabber devices for Windows, iPhone, Android and Tablet for each user without additional licensing, assuming each user will have 10 or fewer devices when your done.You can put your file together in any fashion you like, but I choose to export users via BAT and use that as my reference material for the rest of the files. In CUCM, navigate to Bulk Administration | Users | Export Users. With that file output, Excel functions are your friend and it's fairly easy to create the following file. Use something like ="CSF"&$C2 for device names, something like =&C2&" ,"&D2&" - "$E2 for descriptions, etc.
The format you are looking for is something like:
DEVICE NAME,DESCRIPTION,DIRECTORY NUMBER 1,LINE DESCRIPTION 1,ALERTING NAME 1,ASCII ALERTING NAME 1,DISPLAY 1,ASCII DISPLAY 1,LINE TEXT LABEL 1,ASCII LINE TEXT LABEL 1,EXTERNAL PHONE NUMBER MASK 1,Owner User ID
CSFJONES,"Jones, Jim - JONES",1111,"Jones, Jim - JONES","Jones, Jim - JONES","Jones, Jim - JONES","Jones, Jim - JONES","Jones, Jim - JONES",,,716433XXXX,JONES
CSFSMITH,"Smith, Joe - SMITH",1112,"Smith, Joe - SMITH","Smith, Joe - SMITH","Smith, Joe - SMITH","Smith, Joe - SMITH","Smith, Joe - SMITH",,,716433XXXX,SMITH
Then Bulk Administration | Phones | Insert Phones | Specific Details to add devices of each type.
User / DN association
You need to associate users with DNs to enable phone presence information, and because this association is device specific, you are going to need a row for each device that the DN appears on. If your user had a phone and now has four Jabber devices, that's five rows per user. Excel is your friend again.Create a pivot table with your user export data. Select USER ID, CONTROLLED DEVICE 1 thru CONTROLLED DEVICE 5 (or whatever you need) and TELEPHONE NUMBER as row labels. Go to the USER ID Field Settings | Layout & Print and remove the Display labels from next field in the same column check. Now you will be pretty close and need to copy each user down four rows. Ultimately you are looking for a format like:
User ID,Device,Directory Number,Partition
JONES,SEP00260B5D3D2A,1111, AllLines
JONES,CSFJONES,1111, AllLines
JONES,TCTJONES,1111, AllLines
JONES,BOTJONES,1111, AllLines
JONES,TABJONES,1111, AllLines
SMITH,SEP00260B5E4169,1112, AllLines
SMITH,CSFSMITH,1112, AllLines
SMITH,TCTSMITH,1112, AllLines
SMITH,BOTSMITH,1112, AllLines
SMITH,TABSMITH,1112, AllLines
Upload the file as User Line Appearance, and then Bulk Administration | Users | Line Appearance | Update Line Appearance to associate users to DNs.
User controlled devices
A user needs to have CTI control over the new devices. Again, use the user export data as your baseline and use some Excel text concatenate functions to populate the CONTROLLED DEVICE 2 through CONTROLLED DEVICE 5. Use the ="CSF"&$C2 type of function.Then Bulk Administration | Users | Update Users | Custom File to add control of devices to users.
Friday, June 27, 2014
Cisco UCCX DRS / Backup Status Stuck
Ran into an issue where user was not monitoring the drive space available on their SFTP server / DRS backup target and ultimately filled the drive. Unfortunately UCCX doesn't care when attempting scheduled backups how much space is available and ultimately backup will fail.
What's worse is checking the DRS backup status and finding a backup in progress from days or weeks ago. UCCX gives you a pleasant Cancel Backup button to press, but that may result in a infinite Cancelling Backup status loop, refreshing every 5 seconds.
Fix?
SSH to the UCCX, Primary first if you have HA. then run:
utils service restart Cisco DRF Master
wait for that to complete and then run
utils service restart Cisco DRF Local
If you have a second HA server, repeat the process there.
The good news is this is not business impacting.
Normally.
Thursday, June 26, 2014
Cisco WFO QM / Quality Manager maximum call duration
Running WFO QM 9.0.1.57, found users complaining that audio recordings stop at the 15 minute mark. Examining the recordings verses the contact records in QM, I confirmed that the audio recorded is indeed 15 minutes long, while the call duration can be significantly longer.
If you are running 9.0 with Service Release 4, found in Control Panel | Programs and Features in the name column, you can may be able to adjust the CUCM SIP Session Expires Timer to lengthen the available recording duration.
The default is 1800 seconds, meaning CUCM sends a keep-alive to QM at 900 seconds or 15 minutes, and QM responds, but with an invalid codec in the SDP message. The SIP call is dropped at that point and the recording stops.
Supposedly this is fixed in QM 10.0(1).
Tuesday, June 03, 2014
Cisco Unity Connection Single Inbox 401 Authentication Errors - User Name Limitation
This is another variation of things that cause 401 Authentication Errors when setting up Unity Connection Single Inbox. Another example is here: http://webmaxtor.blogspot.com/2013/11/cisco-unity-connection-single-inbox-401.html
After setting up a new Unity Connection 9 cluster to integrate with Exchange 2010, I ran into an issue with the authentication failures when running the test on individual Unified Messaging Accounts. Running the test against the Unified Messaging Service passed, but this typically only verifies basic network access, domain name resolution and access to the Exchange EWS interface. The Single Inbox feature will fail if the users' Unified Messaging Accounts can't authenticate to Exchange.
The "Unified Messaging Guide for Cisco Unity Connection Release 9.x" integration guide is quite good and covers about all the scenarios I've ever run into. Follow the guide, and all of the guide, and you should be in good shape.
Following that , I had an issue where testing the Unified Messaging Accounts failed with a "Failed accessing xxx@ayz.com Diagnostic=[] Verb =[] url=[] request=[] response[]" message. It is a 401 error, pointing to basic authentication against Exchange issues.
Basic troubleshooting steps, found in just about every Unity Connection guide are:
Check the authentication method on both sides. Check settings in Internet Information Services (IIS) for both AutoDiscover and EWS.
- This was confirmed to be NTLM and HTTPS, under both EWS and Autodiscovery


Try different UM messaging account name formats (i.e. NAME, DOMAIN\NAME, NAME@DOMAIN).
- Tried every combination of names
Reset the UM messaging account password, and enter the password again on Unity Connection.
- Verified name and password via OWA
The UM account should not have a mailbox.
- Verified no Exchange mailbox with admin.
- Another nice method to confirm this again using OWA to check the username and password above. You should be returned an error indicating there is no mailbox for the user.
This technique provided the clue I overlooked a dozen times. There was indeed no mailbox for the user ConnectionUMServices.
Ultimately the issue was that when the UM user account name was created, to keep it obvious and consistent over time, we used a reference straight out the Cisco Unified Messaging Guide. The username for the account we created was ConnectionUMServicesAcct, an example name from the integration guide. The problem here is that when Unity Connection attempts to authenticate against Exchange to synchronize mailboxes, it uses the pre-Windows 2000 logon name format. That format has a 20 character limitation, so the appropritate name entry in Unity Connection is then ConnectionUMServices, not ConnectionUMServicesAcct.

Change the UM Messaging account name in Unity Connection to the pre-Windows 2000 (shorter) name and bingo, you are good.
After setting up a new Unity Connection 9 cluster to integrate with Exchange 2010, I ran into an issue with the authentication failures when running the test on individual Unified Messaging Accounts. Running the test against the Unified Messaging Service passed, but this typically only verifies basic network access, domain name resolution and access to the Exchange EWS interface. The Single Inbox feature will fail if the users' Unified Messaging Accounts can't authenticate to Exchange.
The "Unified Messaging Guide for Cisco Unity Connection Release 9.x" integration guide is quite good and covers about all the scenarios I've ever run into. Follow the guide, and all of the guide, and you should be in good shape.
Following that , I had an issue where testing the Unified Messaging Accounts failed with a "Failed accessing xxx@ayz.com Diagnostic=[] Verb =[] url=[] request=[] response[]" message. It is a 401 error, pointing to basic authentication against Exchange issues.
Basic troubleshooting steps, found in just about every Unity Connection guide are:
Check the authentication method on both sides. Check settings in Internet Information Services (IIS) for both AutoDiscover and EWS.
- This was confirmed to be NTLM and HTTPS, under both EWS and Autodiscovery
Try different UM messaging account name formats (i.e. NAME, DOMAIN\NAME, NAME@DOMAIN).
- Tried every combination of names
Reset the UM messaging account password, and enter the password again on Unity Connection.
- Verified name and password via OWA
The UM account should not have a mailbox.
- Verified no Exchange mailbox with admin.
- Another nice method to confirm this again using OWA to check the username and password above. You should be returned an error indicating there is no mailbox for the user.
This technique provided the clue I overlooked a dozen times. There was indeed no mailbox for the user ConnectionUMServices.
Ultimately the issue was that when the UM user account name was created, to keep it obvious and consistent over time, we used a reference straight out the Cisco Unified Messaging Guide. The username for the account we created was ConnectionUMServicesAcct, an example name from the integration guide. The problem here is that when Unity Connection attempts to authenticate against Exchange to synchronize mailboxes, it uses the pre-Windows 2000 logon name format. That format has a 20 character limitation, so the appropritate name entry in Unity Connection is then ConnectionUMServices, not ConnectionUMServicesAcct.
Change the UM Messaging account name in Unity Connection to the pre-Windows 2000 (shorter) name and bingo, you are good.
Friday, May 30, 2014
Cisco CUCM or Unity Connection LDAP filter
Filter LDAP record import by whether MS AD ipPhone field is populated:
This will work:
(ipPhone=*)
This will work as well, and includes the default search criteria (go with this):
(&(objectclass=user)(!(objectclass=Computer))(!(UserAccountControl:1.2.840.113556.1.4.803:=2))(ipPhone=*))
In case your really lost, put it here:

This will work:
(ipPhone=*)
This will work as well, and includes the default search criteria (go with this):
(&(objectclass=user)(!(objectclass=Computer))(!(UserAccountControl:1.2.840.113556.1.4.803:=2))(ipPhone=*))
In case your really lost, put it here:
Monday, May 19, 2014
Cisco Jabber, Expressway and MRA random notes
These notes can get dated pretty quickly so please use with a grain of salt:
MRA
Other links:
Nice write up re: Collaboration Edge with split DNS
https://ciscocollab.wordpress.com/2014/07/23/collaboration-edge-mra-with-split-dns-domains/
Basic Collaboration Edge rehash:
https://ciscocollab.wordpress.com/2014/01/29/deploying-collaboration-edge/
MRA
- 8841 and 8845 phones while registered through MRA will experience issues dialing while off-hook if the CUCM user controlling them is not in the Access Control Groups Standard CTI Allow Control of Phones supporting Connected Xfer and conf and Standard CTI Allow Control of Phones supporting Rollover Mode.
- Ctrl-Shift-D will open a Cisco Jabber Diagnostics page on the client PC, providing discovery, UCM, voicemail and presence server info, certificate validation, DNS info and directory info.
- Ctrl-Shift-C will open a Contact Resolution page, showing UDS and Outlook connection info, as well as providing ability to lookup contacts and return additional details about the results.
- Assuming Win7, client configuration files will be found at C:\Users\your user\AppData\Roaming\Cisco\Unified Communications\Jabber\CSF
- Assuming Win7 and Jabber for Windows 10.6.X, client configuration files will be found at C:\Users\your user\AppData\Roaming\Cisco\Unified Communications\Jabber\CSF\Config\Cache\cachedTFTPConfigStore.xml
- Assuming Win7, the phot cache can be found at C:\Users\your user\AppData\Local\Cisco\Unified Communications\Jabber\CSF
- Jabber config files must be named with lower case letters.
- Jabber config files must use UTF-8 encoding.
- The default Jabber config file is called jabber-config.xml.
- Different groups of users can use different config files.
- Create a new config file.
- Name it with lower case letters and UTF-8 encoding.
- Upload it to your CUCM TFTP server(s).
- Apply the new config file to one or more CSF devices.
- In the Product Specific Configuration Layout | Cisco Support Field, enter configurationfile=your-group-jabber-config-file-name.xml
- Apply Config / reset the CSF device, quit and restart the Jabber client.
- BDI = Basic Directory Integration and refers to situations where one needs to do a basic LDAP bind instead of relying on the Windows Active Directory Services Interface APIs (see Jabber for MAC, iPhone, etc.).
- Can download jabber-config.xml from TFTP servers via http://yourTFTPserver:6970/jabber-config.xml
- Can verify CUCM response to Jabber client UDS server list via https://
<homeCluster>:8443/cucm-uds/servers - Can verify CUCM response to Jabber client authentication with user via https://<homeCluster>
:8443/cucm-uds/clusterUser?username=<user> - _cisco-uds._tcp.example.com (on Internal DNS)
- _cuplogin._tcp.example.com (on Internal DNS)
- _collab-edge._tls.example.com (on External DNS)
- USE nslookup, then set type=SRV to verify records.
- To clear Jabber cache on Win 10, delete:
- %userprofile%\AppData\Cisco\Unified Communications\Jabber\CSF\Config\service-location.xml
- %userprofile%\AppData\Local\Cisco\Unified Communications\Jabber\CSF\History\%Username%
- %userprofile%\AppData\Roaming\Cisco\Unified Communications\Jabber
- %userprofile%\AppData\Local\Cisco\Unified Communications\Jabber
- C:\ProgramData\CiscoSystems\Cisco Jabber
- To install Jabber but NOT have it assume you want to authenticate with the current Windows user ID and domain, install with the UPN_DISCOVERY_ENABLED command line argument:
- msiexec.exe /i CiscoJabberSetup.msi /quiet UPN_DISCOVERY_ENABLED=false
- the SIP trunk in CUCM to VCS Experssway Core is only for B2B video
- the SIP trunk in CUCM to VCS Experssway Core is not even used for MRA
- the automated neighbor zones on Expressway Core are what's used for MRA
Other links:
Nice write up re: Collaboration Edge with split DNS
https://ciscocollab.wordpress.com/2014/07/23/collaboration-edge-mra-with-split-dns-domains/
Basic Collaboration Edge rehash:
https://ciscocollab.wordpress.com/2014/01/29/deploying-collaboration-edge/
Sunday, May 04, 2014
Standard Local Route Groups number globalization localization
Someday I'll turn this into volume II of Cisco CUCM number plan globalization localization normalization - volume 1 - incoming caller ID CLID.
Or maybe I won't.
At this point, it's the rough notes regarding slimming down the average CUCM database and simplifying administration by using Standard Local Route Groups and number globalization / normalization.
Before:
Location1 Phone
Location1 Device_CSS
Location1 PSTN_PT
Location1 9.1[2-9]XX[2-9]XXXXXX RP
Location1 9.[2-9]XXXXXX RP
Location1 RL
Location1 RG
Location1 Gateway
Location2 Phone
Location2 Device_CSS
Location2 PSTN_PT
Location2 9.1[2-9]XX[2-9]XXXXXX RP
Location2 9.[2-9]XXXXXX RP
Location2 RL
Location2 RG
Location2 Gateway
2 or more locations means:
2 or more Site specific device CSS to contain site specific PTs
2 or more Site specific PTs to contain site specific patterns
2 or more Site specific RP to route to site specific RL (assume no COR or generic blocked patterns on DN CSS)
2 or more Site specific RL to route to site specific RG
2 or more Site specific RG to route to site specific GW
2 or more Site specific GW
After:
Location1 Phone
All Location Device_CSS
All Location PSTN_PT
All Location 9.1[2-9]XX[2-9]XXXXXX PreDot Prefix+ TPattern
All Location 9.[2-9]XXXXXX PreDot Prefix+ TPattern
All Location \+.! RP
All Location RL
Standard Local Route Group
Location 1 RG
Location1 Gateway
Location1 \+.! PReDot CalledPTP
Location2 Phone
All Location Device_CSS
All Location PSTN_PT
All Location 9.1[2-9]XX[2-9]XXXXXX PreDot Prefix+ TPattern
All Location 9.[2-9]XXXXXX PreDot Prefix+ TPattern
All Location \+.! RP
All Location RL
Standard Local Route Group
Location 1 RG
Location1 Gateway
Location1 \+.! PReDot CalledPTP
2 or more locations means
1 Generic Device CSS to contain generic PT
1 Generic PT to contain generic TPs and RP
1 Generic RP to route to single generic RL
1 Generic RL to reference Standard Local Route Group
2 or more Site Specific RG defined as Standard Local Route Group in Device Pool
2 or more Site specific GW
Thursday, May 01, 2014
Cisco CUCM number plan globalization localization normalization - volume 1 - incoming caller ID CLID
For complete and up to date information on Cisco CUCM number plan globalization and localization, please see the latest SRND at Cisco.com: https://www.google.com/search?q=CUCM+SRND
Then when you are good and confused, do yourself a favor and see Mark Snow's excellent write up regarding the same at: http://blog.internetworkexpert.com/2009/12/07/building-global-dial-plans-in-cucm7-part-i-globalization/
Now not being confused but possibly a product of the United States, for some international flair and level setting, see:
http://ciscoshizzle.blogspot.com/2012/05/number-plan-globalization-based-on.html
The motivation behind "globalizing" and "localizing" your numbering plan is basically to simplify the routing of calls when multiple locations and / or countries in your enterprise have different local dialing requirements. Another advantage is to provide consistency to users fielding incoming calls that may cross these requirement boundaries.
For example:
Let's assume you have an office in Lockport NY, USA and another in New York City NY, USA, served by a single CUCM cluster.
Let's also assume that in Lockport NY, making a local, also know as a Subscriber Type call to the pizza place across the street requires you to dial only 7 digits, something like 9 for outside line access and then 438-0645 to reach Stevie V's pizza place. The area code in Lockport is 716 and the complete US telephone number is (716)438-0645, but no one is required or in practice dials the 716 area code in Lockport NY. To dial any number outside of the local area, also know as a National Type call, a Lockport user would dial 9, and then maybe 1(212)438-0645, assuming Stevie V's had a pizza shop in New York City NY, USA, 400 miles away.
Then, let's assume that the New York City user needs to dial 9 and then 1(716)438-0645 to reach Stevie V's in Lockport, a long distance / National Type call, much like how a Lockport user would call the New York City location. Nothing interesting there. Now, if a New York City user wants to order a pizza from across the street, rather than dial 7 digits like a Lockport user, they are required to dial the full 11 digits, 9 and 1(212)438-0645, the same pattern type used for long distance / National Type calls even though it is a call to a local / Subscriber type call to a location right across the street.
There are two problems here.

Now if we want to follow the Cisco SRND rules (skipping call routing for now), we theoretically should localize the caller ID, so that it's familiar to the end user again. From the SRND:
localize the call to comply to the form required by the destination
What this means in our example is we need a method to again remove the +1 or +1716, depending on where the call is answered. We don't want to NOT globalize like we just did because that will provide us with options to simplify call routing. Now that we've globalized for our call routing purposes, maybe we want to again simplify the end user experience though and get rid of the what could be perceived as a weird +1 format.
We now turn to Calling Party Transformation Patterns and Calling Party Transformation CSSs. The basic idea is we can put some patterns in partitions like we always have, and put the partitions in calling search spaces like we always have, and assign the calling search spaces to devices like we always have, but this time we aren't doing it to prevent or allow access to resources like we always have. We are doing it to control the CALLING number (the caller ID), not what you called.
See Call Routing | Transformation | Transformation Pattern | Calling Party Transformation Pattern.
Here you will find what look like the average translation patterns we've always used, but which are designed to specifically modify Calling Party information. Remember we are using Calling Party Transformation Patterns, not Translation Patterns.
In my example, they look like this:


To make these new CSSs, PTs and cngPTPs effective, we need to associate them to the local devices where the calls will be answered and where we need to localize the number, hence the term localize. After we globalized the caller ID and routed the calls around the world, we want to again present the calls in formats that make sense to the local devices where they are answered. For example and again, a (716)NXX-XXXX caller ID should be presented as NXX-XXXX in Lockport, but (716)NXX-XXXX in New York City.
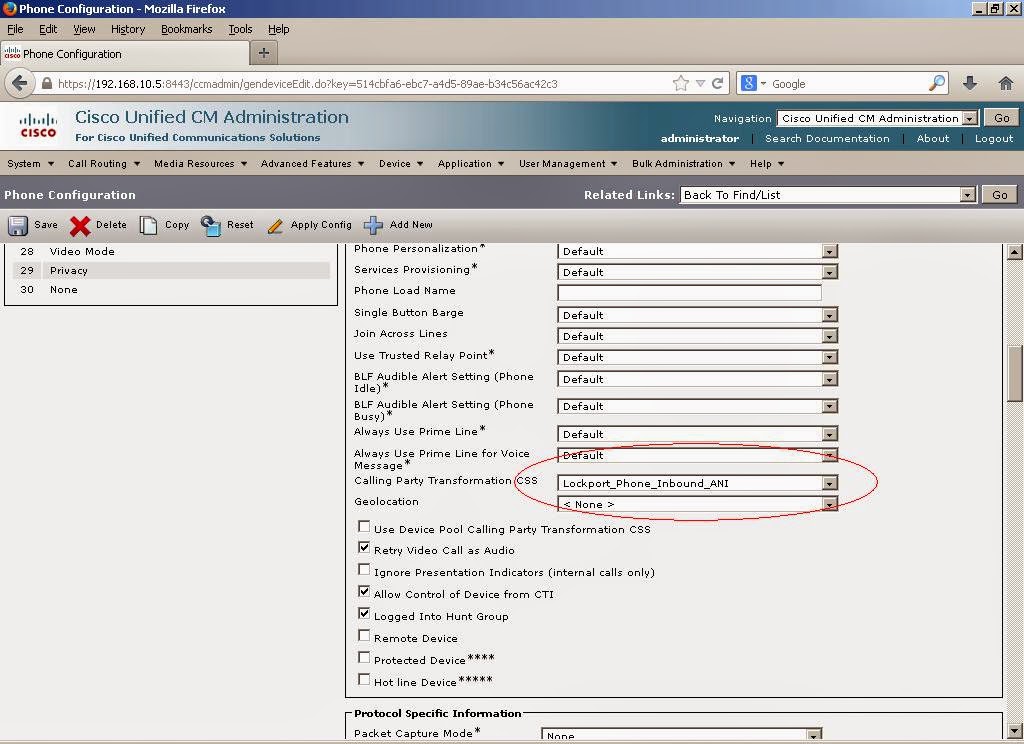
The CSSs you created for these purposes get applied in the Calling Party Transformation CSS fields on the local device. Below you can see them applied to the phone devices themselves in the two locations. You can also apply them at the Device Pool level, if it makes sense in your organization.
With that, the end result is we've globalized the caller ID for incoming calls through the Lockport voice gateway. This provides us with a uniform globally acceptable way to present calls to users throughout the organization and simplifies call routing administration in CUCM. We then localized the caller ID so that users throughout the organization see caller ID in formats that are acceptable to them.
In our example, the incoming call from (716) 555-1212 in the Buffalo area is now presented with 7 digit caller ID to the Lockport users and 10 digit caller ID to the New York City users. Although CUCM has a record of the globalized format, the users enjoy the localized presentation.
TADA... that's the incoming caller ID globalization and localization story. When I have time, I'll document the really fun outgoing routing simplification techniques.
Then when you are good and confused, do yourself a favor and see Mark Snow's excellent write up regarding the same at: http://blog.internetworkexpert.com/2009/12/07/building-global-dial-plans-in-cucm7-part-i-globalization/
Now not being confused but possibly a product of the United States, for some international flair and level setting, see:
http://ciscoshizzle.blogspot.com/2012/05/number-plan-globalization-based-on.html
The motivation behind "globalizing" and "localizing" your numbering plan is basically to simplify the routing of calls when multiple locations and / or countries in your enterprise have different local dialing requirements. Another advantage is to provide consistency to users fielding incoming calls that may cross these requirement boundaries.
For example:
Let's assume you have an office in Lockport NY, USA and another in New York City NY, USA, served by a single CUCM cluster.
Let's also assume that in Lockport NY, making a local, also know as a Subscriber Type call to the pizza place across the street requires you to dial only 7 digits, something like 9 for outside line access and then 438-0645 to reach Stevie V's pizza place. The area code in Lockport is 716 and the complete US telephone number is (716)438-0645, but no one is required or in practice dials the 716 area code in Lockport NY. To dial any number outside of the local area, also know as a National Type call, a Lockport user would dial 9, and then maybe 1(212)438-0645, assuming Stevie V's had a pizza shop in New York City NY, USA, 400 miles away.
Then, let's assume that the New York City user needs to dial 9 and then 1(716)438-0645 to reach Stevie V's in Lockport, a long distance / National Type call, much like how a Lockport user would call the New York City location. Nothing interesting there. Now, if a New York City user wants to order a pizza from across the street, rather than dial 7 digits like a Lockport user, they are required to dial the full 11 digits, 9 and 1(212)438-0645, the same pattern type used for long distance / National Type calls even though it is a call to a local / Subscriber type call to a location right across the street.
There are two problems here.
- To allow for outgoing calls without globalizing / normalizing your numbering, you will need to create a set of route patterns for each location to handle all possible dialing patterns at each location. For example, the Buffalo phones would need access to patterns like 9.[2-9]XXXXXX and 9.1[2-9]XX[2-9]XXXXXX at very least to handle basic local and long distance calls, while the New York City location would need access to patterns like 9.1212XXXXXXX and 9.1[2-9]XX[2-9]XXXXXX to route basic local and long distance calls. In reality, you would need additional patterns at each for emergency, toll free, international, etc. type calls. This may not seem like a big deal with a couple sites and relatively consistent patterns at each, but keep in mind the number of patterns required grows at least exponentially each time a site is added. Adding sites as well as routing features like TEHO, redundancy and international sites can have your numbering plan exploding at the seams in no time.
- Where incoming calls may be distributed to locations that don't use the same dialing patterns (i.e. 7 digits for local calls in Lockport and 11 digits for local in New York City), the location of the incoming caller may not be easily identified by the caller ID. For example, assume a Lockport user orders a pizza from Stevie V's across the street by dialing 9 + 438-0645. Then Stevie V's calls that user back to confirm the delivery location. The Lockport user might see Stevie V's and 4380645 as caller ID in their display and everything is great. Now, let's assume instead the Lockport user went to the bathroom and the incoming calls were temporarily answered by the New York City location. The New York City user would still see Stevie V's and 4380645 as caller ID in their display, since that's how it is presented to the Lockport locations's gateway. There is no way for the New York City user to know where that calls is actually coming from. Unfortunately, when the New York City location confirms their delivery location with Stevie V's in Lockport, the pizza delivery charge gets changed to several hundred dollars and it will likely take 7 hours to get there.
Globalizing and localizing numbers can simplify your dial plan, provide a consistent and familiar user experience, and cuts down on pizza delivery charges.
Or, from the CUCM SRND, we have this general concept description:
Globalized Design Approach
This section describes dial plan features used to implement simplified call routing based on globalized numbers. The simplification is primarily obtained through the use of a single routing structure for off-net calls, no matter the source of the call. For example, two users in separate countries could use the same route patterns to carry calls to their respective local gateways, instead of requiring site-specific route patterns, each configured to match their respective dialing habits.
The main architectural approach used to attain this globalization can be summarized as follows:
- When a call enters the system, the destination number and the calling number are accepted in their local format but are then immediately globalized by the system.
- Once globalized, the called number is used to route the call to its destination through the use of route patterns expressed in the global form. The global form may be a combination of a global internal, enterprise-specific form such as 81001234 and/or a globalized PSTN representation of a DID number, such as the +E.164 form (for example, +12125551234).
- Once a destination has been identified, the calling and called numbers are localized to the form required by the endpoint, the network, or the system to which the call is to be delivered.
Thus, the guiding principle is:
Accept localized forms upon call ingress, and globalize them; route the call based on the globalized form; and localize the call to comply to the form required by the destination.
Wow.
Now that we have all that and given the ideas have been spelled out quite well already (see links above), for those that haven't seen it in action, here's a more pictorial how to.
We start with accepting incoming calls via a H323 gateway in Lockport NY, a small town north of Buffalo NY.
Using a very basic and standard phone device and gateway configuration, we will route calls from outside to DN 300 in the Lockport location. We also have a New York City phone sitting nearby with DN 400 to test with.
 |
| Lockport DN 300 and NYC DN 400 - note the External Phone Number Masks |
When we receive an incoming call from a 585 area code Rochester NY caller through the Lockport voice gateway, the caller ID is presented in a fashion that makes sense in both the Lockport and New York City locations. The caller ID is (585)555-1212 and users in both Buffalo and New York City are able to decipher the calling party is an outside caller in Rochester NY. Since the caller ID is 10 digits and would be the correct number to dial Rochester from either New York City or Lockport, both location users understand where the call is coming from.
 |
| (585)555-1212 calling Lockport through Lockport gateway. Looks good. |
 |
| (585)555-1212 calling NYC through Lockport gateway. Looks good. |
Now, to make things a little interesting, we have to consider what a local / Subscriber type call from the Buffalo area PSTN into the Lockport voice gateway looks like. When we receive an incoming call from a 716 area code Buffalo NY caller through the Lockport voice gateway, the caller ID is presented in a fashion that makes sense only in the Lockport location. The caller ID is 555-1212 and only users in the Lockport location are able to decipher the calling party is an outside caller in the Buffalo NY area, as this is the pattern they would use to dial out to the Buffalo NY area. Since the caller ID is 7 digits and would be the correct number to dial Buffalo from Lockport, Lockport location users understand where the call is coming from. When this same incoming call through the Lockport gateway is presented to New York City users, because the caller ID is only 7 digits, they cannot tell where the call was initiated from.
 |
| An incoming call from Buffalo to Lockport through the Lockport gateway with 7 digit CLID. This looks like a normal local caller to Lockport users. We're good. |
 |
| An incoming call from Buffalo to NYC through the Lockport gateway with 7 digit CLID. This does not look like a normal calling pattern to NYC users who use 10 digits for outgoing. We've got a problem. |
This is not a monster problem as presented, but introduce an international location or two where different country users might not be prepared to remember all the possible off-net dialing combinations, bump your DN lengths up to 4 digits and start adding location codes for users to identify on-net enterprise locations, and all of a sudden you don't know if it's Stevie V's new Japan location calling and answered in Lockport to verify a delivery location or if it's someone named Stevie on his WiFi phone calling to say the elevator is back in service in the NYC office.
So let's fix this. Let's do some cool stuff. Let's "globalize" the numbers that are presented via caller ID. Let's make the caller ID look like a number that could be called correctly from anywhere on the globe (hence the term globalize), regardless of where it came from and where it was answered.
The format we are looking to present the numbers in that work globally is defined by E.164, the ITU-T numbering plan recommendation. Start reading here: https://www.google.com/search?q=E.164.
The secret first step here is to determine, as an inbound call enters a gateway at each location, what each type of call's caller ID looks like. Then we can adjust it at the gateway to match the E.164 format.
In our example, an inbound Subscriber type / ISDN plan call to the Lockport gateway would present 7 digits for caller ID, like we see above in the 555-1212 example. Likewise an inbound National type / ISDN plan call to the Lockport gateway would present 10 digits for caller ID, like we see above in the (585)555-1212 example. Inbound international calls caller ID would be presented as 011 with the country code, city code, etc. following (but I'm too lazy to setup an example test for that).
Therefore, if we could just put a + in front of inbound international call caller IDs, and put a +1 in front of inbound national call caller IDs, and put a +1716 in front of inbound subscriber call caller IDs as they enter the Lockport gateway, we would be all set with globalizing the caller ID of all inbound calls there. It doesn't matter who answers them or where, as the caller ID from the anywhere in the US would be in the +1(NPA)NXX-XXXX format. The inbound local calls from 716 area code would look like +1(716)NXX-XXXX instead of the old, broken NXX-XXXX format, and all other calls would have to cool +1 tacked on as well.
You do this on the gateway, using the Incoming Calling Party Settings. Here's a before and after on our Lockport gateway:
 |
| Incoming Calling Party Settings in the default state |
 |
| Incoming Calling Party Settings, inserting characters in front of CALLING party IDs to globalize them. |
With that, we have basically covered the first general recommendation in the Cisco CUCM SRND regarding globalizing your numbering plan, that being:
Accept localized forms upon call ingress, and globalize them
The end result of prefixing incoming Subscriber / local calls with a +1716 and prefixing incoming National / long distance calls with a +1 is that all the US incoming call caller IDs through the Lockport voice gateway now have the same format, regardless of where on the planet your user might be answering them. It looks like +1 (the plus is a recommended prefix and the 1 is the US country code), then area code, office code and numbers. This is the standard E.164 recommended US format, recognized across the globe. We've globalized.
 |
| Caller ID of +17165551212, a local caller answered in Lockport, shown in a globalized format. This previously displayed as 7 digits, the way a Lockport user would be accustomed to dialing it. This is good, |
 |
| Caller ID of +17165551212, a Lockport caller answered in NYC, shown in a globalized format. This previously displayed as 7 digits, and did not make sense to the New York City user, accustomed to always dialing 1+10 digits. This is good. |
Now if we want to follow the Cisco SRND rules (skipping call routing for now), we theoretically should localize the caller ID, so that it's familiar to the end user again. From the SRND:
localize the call to comply to the form required by the destination
What this means in our example is we need a method to again remove the +1 or +1716, depending on where the call is answered. We don't want to NOT globalize like we just did because that will provide us with options to simplify call routing. Now that we've globalized for our call routing purposes, maybe we want to again simplify the end user experience though and get rid of the what could be perceived as a weird +1 format.
We now turn to Calling Party Transformation Patterns and Calling Party Transformation CSSs. The basic idea is we can put some patterns in partitions like we always have, and put the partitions in calling search spaces like we always have, and assign the calling search spaces to devices like we always have, but this time we aren't doing it to prevent or allow access to resources like we always have. We are doing it to control the CALLING number (the caller ID), not what you called.
See Call Routing | Transformation | Transformation Pattern | Calling Party Transformation Pattern.
Here you will find what look like the average translation patterns we've always used, but which are designed to specifically modify Calling Party information. Remember we are using Calling Party Transformation Patterns, not Translation Patterns.
In my example, they look like this:
Since we need to strip the +1 from the caller ID regardless of whether the call is answered in Lockport or New York City, we create a +1.XXXXXXXXXX pattern a partition associated with Lockport and another in a partition associated with New York City.
Since we also want to strip the +1716 from caller ID of local calls answered in Lockport, we create another +1716.XXXXXXX pattern in the partition associated with Lockport. Since users in New York City need to see the 716 area code when they answer calls, we do not use the +1716.XXXXXXX pattern there. We want to retain the 716, but still strip the +1. The +1.XXXXXXXXXX pattern in the NYC partition will do that for us.
We then create a plain old CSS for each of the Lockport and NYC locations, and put our the new partiton associated with each site in the cooresponding new CSS, which again contain the Calling Party Transformation Patterns required at each site.
The CSSs you created for these purposes get applied in the Calling Party Transformation CSS fields on the local device. Below you can see them applied to the phone devices themselves in the two locations. You can also apply them at the Device Pool level, if it makes sense in your organization.
 |
| Device in Lockport using Lockport base Calling Party Transformation CSS |
 |
| Device in New York City using New York City base Calling Party Transformation CSS |
With that, the end result is we've globalized the caller ID for incoming calls through the Lockport voice gateway. This provides us with a uniform globally acceptable way to present calls to users throughout the organization and simplifies call routing administration in CUCM. We then localized the caller ID so that users throughout the organization see caller ID in formats that are acceptable to them.
In our example, the incoming call from (716) 555-1212 in the Buffalo area is now presented with 7 digit caller ID to the Lockport users and 10 digit caller ID to the New York City users. Although CUCM has a record of the globalized format, the users enjoy the localized presentation.
 |
| A (716)555-1212 caller through the Lockport gateway displaying correct 7 digit localized format in Lockport |
 |
| A (716)555-1212 caller through the Lockport gateway displaying correct 10 digit localized format in New York City |
 |
| Even after localization, the gloabl formats are retained by CUCM to aid in uniform and simplified call routing. |
TADA... that's the incoming caller ID globalization and localization story. When I have time, I'll document the really fun outgoing routing simplification techniques.
To be continued...
Tuesday, April 29, 2014
ImgBurn free CD DVD burner without third party installer
ImgBurn is a great little CD / DVD burning application and can be found via the official site at http://www.imgburn.com. It's also free, so if you use it, please support them via their PayPal link.
With that, it's really kind of difficult to download a current copy without clicking through several mirror site pop-ups and using suspicious third party installers.
If you don't need the latest version, you can find and older SetupImgBurn_2.4.4.0.exe file here: https://docs.google.com/viewer?a=v&pid=sites&srcid=ZGVmYXVsdGRvbWFpbnxyYXltYXNsYW5rYXxneDo0NDU5MzI1Y2YwZTk0OWZk
It appears to be the latest 2.4 version, where the latest release as of now is 2.5.8.
Sunday, April 27, 2014
Cisco MeetingPlace backup to Windows servers using rsync
The Cisco MeetingPlace Application or ExpressMedia server DOES have a backup utility built into the administration pages but unlike other Cisco UC applications, it is not the familiar DRS interface and it does not support SFTP like every other UC server you like.
Cisco MeetingPlace from approximately version 8 on only supports rsync as a protocol to move backup information to an external server. If you aren't Linux / Unix savvy, implementing an rsync server may not be trivial.
The best synopsis of how to do it I can find is here: http://www.backupsecrets.com/articles/displayarticle/id/354
For posterity and safety sake, I'll summarize here as well, but please support http://www.backupsecrets.com.
Assuming you are running a Windows machine of some type, you can get an combined installer for cwRsync Server 3.0.1 and CopSSH from this link: http://wbadmin.info/downloads/cwRsyncServer_3.0.1_Installer.exe
In the event that link breaks, here's another option: https://sites.google.com/site/raymaslanka/home/cwRsyncServer_3.0.1_Installer.zip?attredirects=0&d=1
The cwRsync Server is the piece that will provide the rsync server itself, and CopSSH sets up an SSH server to provide security over your rsync transfers.
The following is straight from the http://www.backupsecrets.com website as it relates to implementing rsync on a Windows machine:
Installing CopSSH and cwRsync

Activating a user
If you are planning to use SSH, then before you register a client with your Rsync server, you must activate a user with CopSSH. In the start menu, under All Programs > CopSSH, select "Activate a user". You will be presented with the screen below. Select a user and hit next. You will be prompted to enter a passphrase which can be any text string.
DO NOT ACTIVATE YOUR ADMINISTRATOR ACCOUNT
Doing so will cause a lock down on the account due to CopSSH's security settings. We recommend activating a newly created account.

Your user's home directory will be located at (for example) C:\Program Files\ICW\home\justin. The location of this directory can be changed by editing the file C:\Program Files\ICW\etc\passwd.
Cisco MeetingPlace from approximately version 8 on only supports rsync as a protocol to move backup information to an external server. If you aren't Linux / Unix savvy, implementing an rsync server may not be trivial.
The best synopsis of how to do it I can find is here: http://www.backupsecrets.com/articles/displayarticle/id/354
For posterity and safety sake, I'll summarize here as well, but please support http://www.backupsecrets.com.
Assuming you are running a Windows machine of some type, you can get an combined installer for cwRsync Server 3.0.1 and CopSSH from this link: http://wbadmin.info/downloads/cwRsyncServer_3.0.1_Installer.exe
In the event that link breaks, here's another option: https://sites.google.com/site/raymaslanka/home/cwRsyncServer_3.0.1_Installer.zip?attredirects=0&d=1
The cwRsync Server is the piece that will provide the rsync server itself, and CopSSH sets up an SSH server to provide security over your rsync transfers.
The following is straight from the http://www.backupsecrets.com website as it relates to implementing rsync on a Windows machine:
Installing CopSSH and cwRsync
- Run the CopSSH/cwRsync installer.
- Continue through the install wizard, installing the package to any location you choose.
- During the installation you will be presented with the following popup. We suggest leaving the SvcCWRSYNC account name as is.

- Later in the installation you will be presented with the below popup. At any time after the install you can access "Activate a user" from your start menu to give SSH access to that user. You must activate at least one user before you will be able to register an Rsync client. Click "OK" to continue your installation.
- DO NOT ACTIVATE YOUR ADMINISTRATOR ACCOUNT.
- Doing so will cause a lock down on the account due to CopSSH's security settings. We recommend activating a newly created account.
Activating a user
If you are planning to use SSH, then before you register a client with your Rsync server, you must activate a user with CopSSH. In the start menu, under All Programs > CopSSH, select "Activate a user". You will be presented with the screen below. Select a user and hit next. You will be prompted to enter a passphrase which can be any text string.
DO NOT ACTIVATE YOUR ADMINISTRATOR ACCOUNT
Doing so will cause a lock down on the account due to CopSSH's security settings. We recommend activating a newly created account.
Your user's home directory will be located at (for example) C:\Program Files\ICW\home\justin. The location of this directory can be changed by editing the file C:\Program Files\ICW\etc\passwd.
- Note: If you need to uninstall the CWRsync server at all, please be aware the two Windows service users ‘SvcCOPSSH' and ‘SvcCWRSYNC' are not removed. So if you then re-install the cwrsync server package the Windows users cannot be recreated and then passwords to do not match. This ultimately means the COPSSH and Rsync services will not start on the server. The fix is to uninstall and remove the users manually then re-install to add the users again with known passwords.
Subscribe to:
Posts (Atom)