Wednesday, December 20, 2017

Blocking Calls Based on Calling Party ID

There are several good write ups on how to block incoming calls on CUCM according to the CLID of the caller.  The feature basically revolves around the ability to "Route next hop by CNGID".  To save reading another version, here's a link to one of the oldest and my favorite:

https://supportforums.cisco.com/t5/collaboration-voice-and-video/blocking-calls-based-on-calling-party-id/ta-p/3113978

Here's an image that summarizes it all:


A big caveat though that I recently ran into is how calls presented to CUCM over a SIP trunk  are presented.  In my case, if a caller was hiding their caller ID the From: field in the SIP header contained the word "anonymous" rather than being blank or including zeros or the like.  The issue here is once you ask CUCM to route via the calling ID and if your calling ID is a word rather than some digits, you will find CUCM can't natively handle a request to route the call to a word.  The call is rejected with a 404 error.

The link above includes references to a LUA script that might be applied to the SIP trunk in question.  It also later references a change to the same LUA script.

I'm frankly not terribly comfortable depending on these scripts since I never craft them myself so I am effectively either relearning what they do on the fly or just blindly putting my faith into them.

The alternative I just used was this config on the CUBE routers in question:

voice class sip-profiles 10
request ANY sip-header From modify "<sip:anonymous@" "<sip:0000000000@"

voice service voip
sip
sip-profiles inbound
sip-profiles 10 inbound

It's a more aggressive version of a SIP profile modifying only INVITES suggestion found here:
http://technologyordie.com/calling-party-routing-of-anonymous-calls-sip-header-fix-up

The idea is the same regardless.  Replace the useless caller id (ie: the word "anonymous") with something else that CUCM understands (ie: 0000000000).

If you have been blocking calls like this and finding you and yours moving to SIP trunks, be forewarned and address it now.

Wednesday, November 08, 2017

UiPath Close Application Activity Value does not fall within the expected range.

While working in UiPath on a UCCX related RPA robot I found the Close Application activity was raising an exception

Main has thrown an exception

Source: Close application

Message: Value does not fall within the expected range.


I couldn't find a solid example of how to implement it correctly in the UiPath documentation but did find the UiPath Academy does provide a sample with the answer.  Ultimately you need to populate the Close Application Target.Selector property correctly.  It does not automatically inherit it from a Open Application activity.


Selector not populated
Selector populated (notepad.exe example)

You can find the appropriate value by one of two ways.  Simply using the Indicate on Screen feature of the Close Application activity to point to a running instance of your application will automatically populate the Target.Selector property.


No Screenshot Selected

Notepad selected (with error message)

Alternatively, you can use the UiExplorer on the Studio menu to find your application XML snippet and populate it manually.

I, for one, welcome our new RPA overloards.

Wednesday, October 11, 2017

End to end authentication and encryption in Cisco Collaboration and through MRA

It's 2017.  You want end to end authentication and encryption. outside and in. You should see padlocks everywhere.

Here's how to get yours.
 
Ten easy steps (super abridged version):

Look for your padlocks!
  1. Sign your CUCM tomcat and CallManager certificates, IM&P tomcat, cup-xmpp and cup-xmpp-s2s certificates and UCXN tomcat certificate.
  2. Activate and start CAPF on CUCM and restart TFTP.
  3. Install LSCs on devices via CAPF enrollment.
  4. Change CUCM to Mixed Mode and retart TFTP and CallManager.
  5. Create a secure Phone Security Profile and apply to on-premise endpoints.
  6. Sign Expressway C server certificate and include an alternate name to use as a CUCM device security profile name.
  7. Sign Expressway E server certificate and include an alternate name of just domain.
  8. Configure Expressway C and E for MRA.
  9. Configure a secure Device Security Profile called your C alternative name and apply to outside CUCM devices.
  10. Make calls and enjoy the padlocks.
So you want secure audio to Unity Connection too?
  1. Apply a secure profile to the CUCM SIP trunk where the Subject Name is CUC FQDN and transports use TLS and port 5061.
  2. Change your CUC port group to use 5061/TLS, Next Generation Encryption and sRTP.
Extra credit fun notes:
  • If using TLS to secure communication between CUCM and your LDAP server, change the port from the default 389 to 636.

Friday, July 07, 2017

Unity Connection Cobras Export Import Schedule Detail Missing

I recently used the Cobras Export and Import tools found at http://ciscounitytools.com to perform a physical to virtual migration and upgrade from Unity Connection 8.6 to 11.5.

One issue I found was that schedules with multiple details weren't imported completely.  I don't know if this is an issue with the export or the import process or possibly with the Connection versions but after checking the target 11.5 cluster I found only the first detail in the schedules with multiple details was restored.

It may also be worth noting that all the detail in each of the affected schedules were named the same, for example "Detail for All Hours - All Days" used multiple times to describe individual detail for each day.  I don't remember seeing anyone use this technique elsewhere so it may also have been a contributing factor.

Lesson learned: check your schedules after your import is complete.


The Cobras Export for Connection version was 8.0.76 and Import for Connection was 8.0.92.

Friday, June 30, 2017

Failed to mount Cisco Prime Collaboration Deployments export as NFS store to the ESXi host.

Running Cisco PCD 11.5.3 to migrate / upgrade CUCM and IM&P from version 8 to 11, and from physical to new virtual C240 chassis.  After installing PCD on one of the chassis and adding the CUCM cluster to inventory, I had trouble adding the new C240 ESXi hosts to inventory.

After entering the correct ESXi interface address and double checking the root password, I was consistently returned an error that says:

"Failed to mount Cisco Prime Collaboration Deployments export as NFS store to the ESXi Host.  Please look at the exception details in PCD logs and check the ESXi logs for further details of the exceptions reported on PCD."


There were no obvious events in VMware corresponding to trying to add the hosts to inventory in PCD.  The PCD logs did have entries showing Java exceptions but there was no verbose comments to indicate what raised the errors, nor could I find any Cisco documentation regarding deciphering the logs.

There are lots of discussions on the Internet and Cisco's support forums regarding the common causes of this problem.

  1. Your VMware license type may be unsupported.  If you have the Cisco UC Virtualization Hypervisor (appears as "Hypervisor Edition" in vSphere Client) license installed, you can remove it temporarily and use the Evaluation Mode license.  I had no license installed yet and was in Evaluation Mode.
  2. Network issues like firewalls between PCD and the host or poor DNS implementations may cause this.  In my case, PCD was running on the same host I was trying to import with no firewall or ACLs between the PCD and ESXi networks.  DNS resolution worked forward and reverse everywhere.
  3. Vmware being in lockdown mode may cause this.  This was easy to confirm from the VMware and ESXi configurations and I went so far as tring to set "utils os secure permissive" in the event something was overly restrictive in PCD's OS.

Ultimately my problem was an issue with an OVERLY COMPLEX PASSWORD on the ESXi root user account.

I didn't want to change the root user password as it was terribly complex and few knew it.  Adding a new user with a password comprised of just alpha characters allowed me to complete the ESXi import almost instantly though.

One challenge is ESXi 6 now enforces complex passwords by default, so this is easier said than done.

To support less complex password in ESXi 6 you can modify the security setting string under "Advanced Settings | Security".  The default ESXi 6 string is "retry=3 min=disabled,disabled,disabled,7,7"  From VMware's site "With this setting, passwords with one or two character classes and pass phases are not allowed, because the first three items are disabled. Passwords from three- and four-character classes require seven characters."

First I modified that string on the two chassis that would be running the enterprise. The much less restrictive string found in ESXi 5 is "retry=3 min=8,8,8,7,6".


Then I added a new user through my vSphere client that I would use for PCD purposes.  I planned to then delete it when the project was complete.  Here I added the "pcd" user, and because I already modified the ESXi security string I could use a simple password like "MyPassword".


Then I added the Administrator role to the pcd user so that PCD could actually manage the host.  This provides more privileges than is actually required but I did not want to troubleshoot permissions during the project and would be removing this account later regardless.


Adding the ESXi hosts to PCD inventory then worked instantly using the new "pcd" user and password.

In hindsight the PCD logs did reference:

2017-06-29 15:24:32,863 ERROR [pool-3-thread-14] db.DBEntity.hexStringToByteArray - Exception parsing int
java.lang.NumberFormatException: For input string: "y2"

I imagine if PCD is looking at the ESXi inventory password as a string of hex characters then using extended characters might break the process.  This is just conjecture though.

Monday, May 22, 2017

Cisco Quality Manager 11.5.1 SR6 with Microsoft SQL Server Express 2014

After smashing around in SQL for too long to get the basic QM communication to work (shown below), I found that Andrzej GoÅ‚Ä™biowski  documented the same requirements at http://blog.citrix24.com/configure-sql-express-to-accept-remote-connections/ back in 2014.  He has some additional detail regarding SQL versions, service usage and best practices there. I encourage you to check it out.  My info is limited to the basics required to get QM running on a rainy Tuesday morning.

I was recently tasked with spinning up a Cisco WFO QM / Quality Manager instance for a demo to be run out of our own office.  Given it was only a demo I used a small stand alone OVA for QM (version 11.5(1) currently available here),  a trial version of Windows Server 2012 R2 ( https://www.microsoft.com/en-US/evalcenter/evaluate-windows-server-2012) and a  version of MS SQL Express 2014 (https://www.microsoft.com/en-US/download/details.aspx?id=42299).

When downloading MS SQL Express, choose the ExpressAndTools 64BIT\SQLEXPRWT_x64_ENU.exe version.  You may have to scroll down a bit on MS's page to find it.  Having the extra administration tools available up front is worth the extra few minutes it takes to download the media.

If you are not typically administering MS SQL servers, you will need to perform some SQL setup that is not documented in the Cisco QM install information.

You will need to enable TCP connections to SQL server.

  • Run Microsoft SQL Server Management Studio.
  • Right Click on your SQL server and choose Properties.
  • Verify Allow remote connections to this server is checked.


  • Run SQL Server Configuration Manager.
  • Expand SQL SErver Network Configuration and select Protocols for SQLEXPRESS
  • Right Click TCP/IP and choose Enable.

You will need to set SQL Server to listen on a static port.

  • Still in SQL Server Configuration Manager...
  • Expand SQL Server Network Configuration and select Protocols for SQLEXPRESS
  • Right Click TCP/IP and choose Properties.
  • Choose the IP Addresses tab.
  • Scroll down to the IPAll section.
  • Remove the value in TCP Dynamic Ports.
  • Enter 1433 as the TCP Port


  • Still in SQL Server Configuration Manager...
  • Choose SQL Server Services.
  • Right Click SQL Server (SQLEXPRESS) and choose Restart
  • After the server is restarted, make note of the Process ID.
  • From the windows CLI, run netstat -ano | find /i "<your process ID>" 
The listening port should now be 1433.
 You will need to turn on the SQL Server Browser Services

  • Still in SQL Server Configuration Manager
  • Choose SQL Server Services.
  • Right Click SQL Server Browser and choose Properties.
  • On the Service tab,  change the Start Mode to Automatic.
  • On the Log On tab, choose the Start Button.


Assuming you've previously followed the Cisco QM Installation guides, you should now be able to have QM make successful connections to SQL server.

Sunday, May 07, 2017

MS Windows 10 desk top icons detail and list view


Edit: As of May 19, 2017 this feature seems to have been broken by some Windows updates. Crl Shift 1 - 4 resize the icons but I can no longer get them to appear in "ListView".

For years I've had a small program running at startup on my Windows 7 based PC.  It would convert the icons and text on my Win7 desktop to what look likes the list view in Windows Explorer, allowing me access to dozens of frequently used shortcuts, files and folders there without consuming much real estate or requiring flipping between my applications and my desktop view.

My internal IT team was kind enough to upgrade my laptop recently and I was happy to find Windows 10 now has this feature built in.

To emulate my old experience, while your desktop has the focus, press Ctrl Shift 5.


If you'd like additional detail, Ctrl Shift 6 changes the view what appears to be the Explorer Details view.

It seems Ctrl Shift 0 through 9 may provide easy switching between various views.

Cool.  Thanks Windows 10.

Friday, May 05, 2017

2N Helios IP Force and CUCM IP Phone Services

Client acquired several 2N Helios IP Force door phones with integrated cameras with the intention of using them to open door locks nearby.  In addition to the normal DTMF triggering method, they wanted to have the ability to unlock them without calls to the door in progress.  The plan was to use the Helios automation features to respond to CUCM device Service URL button pushes.

The Helios units require the "Enhanced Integration" or "gold" license to use the automation features.
Navigate to System | License and check the License Status area to confirm you have it available.


In my environment we will be using the first relay on the Helios device to trigger an electronic door lock.  We need to flip the Helios relay for 5 seconds, which will unlock the door, and then flip it back to allow the lock to re-engage.

Navigate to Hardware | Switches and the Switch 1 tab.
Confirm "Switch Enabled" is checked.
Confirm Switch Mode is Monostable.  This means it will flip on and stay on for X amount of seconds, then flip off. 
Set Switch-On Duration to however many seconds you need the switch on.
Assuming you have already wired the door lock to activate via this switch, you can press the Test the Switch button here and verify it works.


Navigate to Services | Automation
Pick a function tab and confirm "Function Enabled" is checked
On row ID 1, change OBJECT TYPE to Event.HttpTrigger.  On the same row in the PARAMETERS field enter "Name=opendoor" 

 This now defines a trigger for a function that the Helios IP Force will perform when it handles an HTTP request.  The word "opendoor" on the HTTP URL is what triggers this particular function.

Now make your function actually do something.  Our something is pretty simple.

On row ID 2, change the OBJECT TYPE to Action.ActivateSwitch.  On the same row in the PARAMETERS field enter Switch=1;Event=1.

The Event=1 parameter means do something when the event on row 1 happens (our opendoor HTTP trigger above).
The Switch=1 parameter means do something to the switch number 1 on your Helios unit (different units may or may not have the same number of switches).
The Action. ActivateSwitch is similar to pressing the Test the Switch button above.  Depending on how your switch is configured (i.e. Monostable) defines what ActivateSwitch actually does. 

Again, because the HttpTrigger (opendoor) happens on row one (ActivateSwitch and Event=1), switch number one is turned on (ActivateSwitch and Switch=1) for five seconds (Switch-On Duration) and then turned back off (Switch Mode is Monostable).

In a browser enter http://<IP address of Helios endpoint>/enu/trigger/opendoor

Navigate to Status | Events to see the Helios responding and check your work.  You should see switch=1 changing to true and then five seconds later to false.


If this works, you can now have CUCM users (receptionists, safety staff, etc.) perform this function from a button on a phone.

In CUCM navigate to Device | Device Settings | Phone Services
Add a new service using the Service Category "Web Link" and the Service Type "Standard IP Phone Service"


In CUCM navigate to Device | Phone and find the phone that will press a button to open the door.
Choose Subscribe / Unsubscribe Services from Related Links.  Choose the Service you created above.


On the same device, add a Service URL button and configure with the subscribed service.


Pressing that button should now trigger the HTTP Event and function that turns on the Helios switch 1, opening the attached door.


Thursday, April 20, 2017

Cisco Unity Connection InitMMAppletInstance failed to get instance Failed to record name Unable to save recording due to SSL Certificate error

Using the Java based Media Master control in Unity Connection to record or upload greetings has historically been a disaster.  To complicate the issue, browser vendors are now dropping support for the Java plugin entirely.  What this means is if you are still supporting an older version of Unity Connection, what used to be a completely unreliable method to manage greetings is now impossible from an up to date PC / browser.

As a work around,  you can still get your hands on old versions of Firefox that will support old versions of the Java plugin.

I would suggest using an Extended Support Release rather than experimenting with older, possibly buggy, possibly insecure versions.  The Mozilla Firefox 52 32-bit ESR / Extended Support Release as of today April 20, 2017 continues to support NPAPI based plugins (i.e. Java). You can download that version here: https://www.mozilla.org/en-US/firefox/organizations/

Remove any version of Firefox you have and install this version.

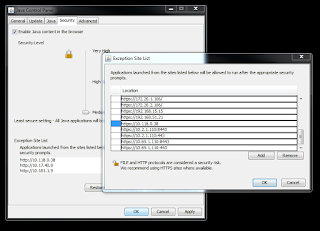
The Exception Site List feature of the Java plugin was introduced in Java 7 Update 51. You'll need that feature to get the Media Master to work but you need to stay away from updated Java plugins.

You can download the Windows x86 Offline Java installer for Java 7 Update 51 here:  http://download.oracle.com/otn/java/jdk/7u51-b13/jre-7u51-windows-i586.exe  (you'll need to create an account).  If you don't trust me to access the EXE directly, the official Java archive page is here:  http://www.oracle.com/technetwork/java/archive-139210.html  You can start there and find it yourself. 

- - Un-install all your other versions of Java and install this one.
- - Go to Control Panel | Java 32-bit | Security and set your security level to medium.
- - Go to Control Panel | Java 32-bit | Security | Exception Site List and add you Unity Connection Publisher and Subscriber.  Use the format https://:8443 and https://:443


You should now be able to run the Unity Connection Media Master (at least back to version 8.6) in Firefox, play, upload and save greetings.  You may still be prompted a handful of times to allow Java to run, and possibly have to save the greeting multiple times in Unity Connection after SSL pop-ups, but it works.

Trust me.  I did it yesterday. 

Don't forget to delete this version of Java and Firefox before your IT security team freaks out.

Thursday, March 09, 2017

Cisco UCCX upgrade - An error has occured but no messages are available. This can happen when another administrator is working on the system at the same time and triggers an error.

While recently working on upgrading a client from CUCM, IMP, CUC and UCCX version 9 to 11.5.X (and we'll throw Expressway in there too) I ran into a snag while upgrading UCCX.

I was diligent with preparation and found their 9.0.2.11001-24 / SU1 version did not support a direct upgrade to 11.5.1.  My plan was then to get them to 9.0.2.11003-44 / SU3 first and then to 11.5.1, a supported upgrade path.

To get to  SU3 I had Prime Collaboration Deployment install it's own ciscocm.ucmap_platformconfig.cop file during discovery, install the ciscouccx.refresh_upgrade_v1.11.cop to get it out of the way, and then turned it loose on upgrading to SU3.  That went fine although the jury is till out on what efficiency gains I made using PCD.

Shortly after triggering the upgrade to 11.5.1 I was greeted with a "Task paused due to task action failures." email from PCD.   Downloading and digging through the install logs returned nothing very obvious.  

I showed the current version to confirm I had some SU3 success and all looked good.

admin:show version active
Active Master Version: 9.0.2.11003-44
Active Version Installed Software Options:
ciscouccx.refresh_upgrade_v1.11.cop
ciscocm.ucmap_platformconfig.cop
admin:


A manual upgrade attempt made a symptom perfectly clear though.

admin:utils system upgrade initiate

Warning: Do not close this window without first canceling the upgrade.

An error has occured but no messages are available.  This can happen when another administrator is working on the system at the same time and triggers an error.


There was no other administrator with access to the system.  In the event PCD was being considered an administrator I cancelled and deleted the associated task there.  Another manual run attempt resulted in the same An error has occured but no messages are available. message though.

Google matches consistently referred to a missing refressh cop file.  All documentation indicated my ciscouccx.refresh_upgrade_v1.11.cop was appropriate, PCD indicated it completed the task for me and I could see it in the active partition myself.

Ultimately the fix was to manually install the ciscouccx.refresh_upgrade_v1.11.cop again.

Possible problem scenarios are:
  1. the cop file first install used a fragged version or blew up the version of the cop file on the PCD server
  2. PCD shouldn't have been used to simply install the cop file
  3. the fact the cop file was installed before the upgrade to 9.0.2 SU3 rather than 11.5 invalidated its usefulness
  4. stuff happen  
It seems the consensus is correct that the error points to some missing refresh upgrade preparation, but thought my "Trust me... just try it again" theory might help someone shave an hour or two off you upgrade weekend.

Good luck.

Saturday, February 04, 2017

UCCX Finesse and Spark Team Announcement gadget as a CAD CSD team messages and chat replacement

While upgrading clients to UCCX 11 and 11.5, and away from CAD and CSD to Finesse, one feature often found lacking is the old team messaging and chat features available via CAD.

After experimenting with Cisco's Spark Care Assistant bot at https://depot.ciscospark.com I thought it might be a good option to use as a replacement.  My plan was to possibly incorporate this bot or one similar into Finesse as a gadget to replace the missing CAD/CSD feature and allow broadcast messages from supervisors to agents.  It would also give me the opportunity to dig a little into Spark's and Finesse's feature set and the related javascript and css design that would hold it together.

Then I found I would be reinventing the wheel, as Cisco already published a Spark Team Announcements Gadget here some time ago: https://communities.cisco.com/community/developer/finesse/blog/2016/09/28/try-out-the-new-cisco-spark-team-announcements-gadget  That took some fun out of the project for me but at least Cisco seems to be addressing Finesse native shortcomings in some fashion.

Get the gadget:

You can get the Spark Team Announcements Sample Gadget code here: https://github.com/CiscoDevNet/finesse-sample-code/tree/master/SparkTeamAnnouncementsSampleGadget Make note that the gadgets are version specific.  I've used a few of Cisco's gadgets on UCCX version 10.6 before they were moved to github and getting new gadgets to work on older versions had some challenges for awhile.  I suppose they will be another thing that needs to be considered carefully during upgrade processes.  There is a nice post regarding version differences here https://communities.cisco.com/community/developer/finesse/blog/2016/03/16/how-to-convert-your-existing-1051-custom-gadget-to-work-with-1061-or-1101 that may be helpful at least for awhile.

Install the gadget:

Even if you are using UCCX with Finesse running co-resident you still have the ability to install gadgets directly on your UCCX server to be referenced by Finesse.  There is a 3rdpartygadget account in UCCX / Finesse that can be used to upload gadgets.

You'll need to reset the account password to something you know by SSH'ing to the UCCX CLI and running utils reset_3rdpartygadget_password.

Once you have that, you can transfer files to and from UCCX's / Finesse's gadget folder http:///3rdpartygadget/files/ via SFTP.  To make life easy, I might suggest using WinSCP here https://winscp.net/eng/index.php or a similar tool to provide a graphical interface during the process. Here what that looks like if you haven't used it:


Implement notes:

The gadget code from github includes a great PDF describing the implementation steps.  I did get tripped up a couple time though.

You'll need to go to https://developer.ciscospark.com/ and create a new integration.

My first hurdle was simply having an icon available to visually identify my new "App".  It seems you are required to host a 512x512 pixel icon somewhere publicly to be used visually and you cannot proceed through the integration creation without it.  If you don't have a public web server somewhere, you might investigate a free version like https://sites.google.com.  I had mixed results using links from file sharing sites and while the URL is rather convoluted, the image sitting on my Google sites page seems to work well for some reason.  Ultimately I came up with this one one:

https://1e96032b-a-62cb3a1a-s-sites.googlegroups.com/site/raymaslanka/home/ICON.jpg?attachauth=ANoY7conMrxe3vubOApA3QL0VU9SYLkYZtEkqh2ExwWnV6g0eaeFPbp6lJosaNIBEdSXktxz2Dk45_OEay9KxHSy55uLsXtijrqDYMwWLd9KDTvviKqzl8_PUjCRkQtwQ3JJotpbPC4RQNQEBuTQBE4R6Y0UQWPxf9UnyCfMAy3eVnBfsSrNKYrfqy6ZznWZSK3jdPI0Qw3xIxIb0Lsh_x4WJ-PWfTa4RQ%3D%3D&attredirects=0
FQDN vs IP ?:

When setting up the integration, I would suggest using the FQDN of your UCCX / Finesse server. I had issues attempting to use the IP address of the server for some reason.  Your results may vary. 

My working Redirect URI looks like: https://sc-uccx01.my-demo-domain.com:8445/3rdpartygadget/files/SparkTeamAnnouncements/oauth.html

This did not work for me for some reason: https://172.22.115.50:8445/3rdpartygadget/files/SparkTeamAnnouncements/oauth.html

This needs to be accessible by your Finesse users, not just Finesse via a relative link you may have used elsewhere. You can verify you have the URL correct by just accessing it trough your browser and should expect to be returned this:


Editing your integration:

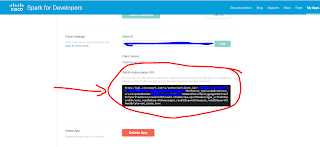
If you need to change your integration's Redirect URI at https://developer.ciscospark.com note the OAuth Authorization URL will be changed as well.  Changing this:


changes this as well:


So...  when you change your Redirect URI on Cisco's site, you will need to update your oauth.html with the new Redirect URI, AND ALSO your SparkTeamAnnouncements.js with the new OAuth Authorization URL.

User experience:

When it is all done and working a Finesse user should expect a new page or tab to pop after entering their normal Finesse credentials.  This will prompt them to log into Spark.  Note, you CAN log into Spark with an account different than your Finesse domain.  You'll also be challenged to allow the new integration access to some Spark features.

Oh look... my icon is missing
If that is successful, the new tab will close and you'll have access to Spark wherever you placed it in Finesse.

Fun.