Thursday, May 09, 2019

Cisco CUCM BAT User Must Change at Next Login PIN option

Running 12.5.1.10000-22, you may need to change the end user credential option requiring "User Must Change at Next Login".  If you have a small subset of users that need to be changed and / or defaulting the PIN is not an issue, you can use  Bulk Administration | Users | Reset Password / PIN | Query.  The problem here is you need to enter a default PIN value to proceed, potentially creating issues for users that have already had documented PINs set for them in other bulk jobs.

End User Edit Credential

  1. Bulk Administration | Import/Export | Export
  2. Under User Data, check End User
  3. Add Tar file name, check Run Immediately, do not Check Dependency, and Submit
  4. Bulk Administration | Upload/Download Files
  5. Find Tar file name above and download
  6. Open enduser.csv in Tar file
  7. Change PIN MUST CHANGE AT NEXT LOGIN 1 from t to f on rows required (can delete rows that are not required for faster processing)
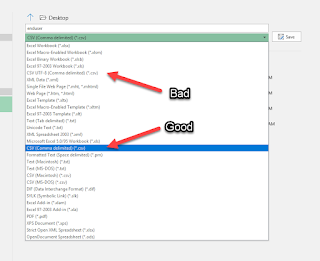
  8. Save enduser.csv but DO NOT SAVE AS UTF-8.  Excel will default to CSV (Comma delimited) (*.csv).  Although other jobs seem to require UTF-8 encoding, this particular job seems to fail if you save with Excel's CSV UTF-8 (Comma delimieted)(*.csv) option.
    Do NOT use UTF-8 here.
  9. Add enduser.csv back into Tar file, overwriting existing copy.
  10. Bulk Administration | Upload/Download Files
  11. Add New, find Tar, choose Import/Export and Import configuration
  12. Bulk Administration | Import / Export | Import
  13. Choose Tar, then check End User, check Override the existing configuration, check Run Immediately and Submit.
BAT Job Scheduler Success Sample
BAT Job Scheduler Failure Sample


Tuesday, March 19, 2019

Cisco VG350 BAT to add or update lines

It's 2019 and whether you like it or not we still have to support analog endpoints.  Adding them manually in any sort of quantity is awful.

Cisco TAC has a nice write up on what's required here: https://www.cisco.com/c/en/us/support/docs/unified-communications/bulk-administration-tool/118882-config-vg-00.html  I suspect it's a matter of time before that link breaks though and I've added some detail to steps below that seems to trip everyone up.

Update the device and line level configuration of ports on an existing Cisco voice gateways via BAT
  1. Navigate to your CUCM administration at https://YourServerName
  2. Choose Bulk Administration | Import/Export | Export
  3. Under Device Data, choose Gateway
  4. Select a filename, Run Immediately and Submit
  5. Choose Bulk Administration | Upload/Download files
  6. Choose the .tar file you created above and download.
  7. Make a backup copy.
  8. Extract the .tar file using 7zip to a folder and open the .csv file.
  9. The port and the DN configurations are to be entered under the section Entity:ANALOG.
    1. Optional: If you want to avoid updating or overwriting existing gateway and port configurations, you can remove the gateways, inventory and ports from the gateway.csv that you want to ignore.
      1. Remove all the gateways from Entity:GATEWAY except for those you are updating.
      2. Remove all the inventory from Entity:SLOTCONFIGURATION except that related to the gateways you are updating, where GATEWAY NAME = DOMAIN NAME.
      3. Remove all the ports from Entity:ANALOG except those you are updating or adding.
        CUCM Gateway BAT export and edited import file
  10. All the columns need to be updated in this section.
    1. You can increment the PORT NUMBER column within a slot and subunit
    2. You can increment the last two ENDPOINT NAME characters in hex
    3. The DESCRIPTION field should be 50 characters or less.
    4. The LINE DESCRIPTION 1 field should be 50 characters or less.
    5. Apostrophes in the LINE DESCRIPTION, ALERTING NAME, etc. will result in errors like 'AN695ABCDEFABCDEF' A syntax error has occurred. but seem to be accepted regardless.
  11. Save the .csv file with the same name and in the same folder where you extracted the .tar file.
    1. The gateway and header files should be encoded and / or saved as UTF-8 to allow for special characters in gateway names.
  12. Use 7zip to create a new .tar file of this folder.  You can alternatively simply add the edited csv back into the original downloaded tar file.
    1. The tar file should include a folder of the same name.  The header and gateway files should then reside in that folder.  They shouldn’t be in the root of the tar file.
  13. Choose Bulk Administration | Upload/Download files | Add New
  14. Choose the .tar file, choose the target as Import/Export, choose the Transaction Type as Import Configuration, and click Save.
  15. Choose Bulk Administration | Import/Export | Import. Choose the .tar file uploaded above and then Next.
  16. Under Device Data, choose Gateway and toggle "Override the existing configuration" as required. Run the job.

Wednesday, February 06, 2019

Cisco CUCM 12.5 and Unity Connection 12.5 upgrade notes

Once on 12.5 you have new Install/Upgrade Cluster and Reboot Cluster menu options available from the Platform Administration GUI.  These are great features previously only available through Prime Collaboration Deployment, now embedded in CUCM.  When using the Reboot Cluster option and adjusting the sliders to customize your reboot or swich version order, remember to click Save before clicking Reset, Restart or SwitchVersion though.  If not, you will find after the publisher reboots the sliders are back to default and all the CUCM subscribers will reboot simultaneously.  This is likely not what you wanted if you were using the sliders in the first place and will generally create the greatest interruption in service.  Thanks James for the screenshot of what it looks like when you do it correctly. A complete cluster reboot after the successful upgrade and interrupted but manually completed switch-version did not correct the stuck interface status.  Cisco TAC has been engaged, a bug is being created but in the meantime root access is required to remove something called clusterStatus.json as a workaround.
James clicked Save. This is good.
I didn't click Save, then clicked Cancel, now stuck like this.  This is bad.


After upgrading Unity Connection from 12.0 to 12.5 I found I was unable to log in using the application administrator credentials.  I was returned Non Defined IMS Exception on the log in page.  Neither restarting Cisco Tomcat nor the cluster as some posts suggest helped.  Ultimately you may be able to correct it by resetting the administrator password with utils reset_application_ui_administrator_password and may need to actually run it on both servers once.

Non Defined IMS Exception


On CUCM after upgrading to 12.5, switching versions and everything looking good, you may be returned Add/Update/Delete not allowed as a system upgrade is in progress on the admn page.  Running show version active / inactive and utils system upgrade status may show the upgrade is complete on all nodes.  You actually have a replication issue.  Run the usual utils dbrepication status and utils dbreplication runtimestate, cross your fingers and wait patiently.

Add/Update/Delete not allowed as a system upgrade is in progress

When running SIP traces in RTMT via Voice/Video | Session Trace Log View | Real Time Data, the Calling Number/URI search criteria will be your External Number Mask, verses your DN.  CDR  Analysis and Reporting will show your DN in the originating field while Real Time Data shows your mask.  This may make sense from a SIP vs reporting perspective (and may actually have always been that way) but if you are juggling both tools, I hope this saves a bit of sanity.

Calling number is your mask vs DN.

Thursday, January 17, 2019

UCCX Finesse using custom Call Variable Layouts

Cisco's documentation has always been rather spartan regarding assigning / presenting custom variable layouts to agents:

To display a custom Call Variables Layout, in the Unified CCX routing script, set the user.layout ECC variable to the name of a configured Call Variables Layout. In this case, if no custom layouts match the user.layout value (or no custom layouts are configured), Finesse displays the default layout.

Here's my note to self (note this is circa UCCX 11.6):

First, in your script / Cisco Unified CCX Editor, choose Settings | Expanded Call Variables.

There you will need to add at least one variable named user.layout.  This special variable and its value is what Finesse uses to decide whether to present the default layout or a custom layout you create to your agents.

Here you can also create custom variables you can populate in your script to present agents interesting info.

For example, I added userCSQ that I will use to present the name of the queue that is processing the call when an agent answers. Perhaps an agent answers sales and service calls.  You can populate userCSQ here with "Sales" and present that to an agent in Finesse so they can answer appropriately.


Then, in your script you need to populate the variables using a Set Enterprise Call Info step.

In the Expanded Call Variables tab you want to associate values with the variables you just created.  Here I set the user.layout variable to "ITS Layout".  Note this value will be the name of the Call Variable Layout you later create in Finesse Administration.  When an agent is presented a call by this script after this Set Enterprise Call Info step, the agent will see the Call Variable Layout named ITS Layout.

So, you're not associating Call Variable Layouts with UCCX Teams, nor Finesse Desktop layouts. You use the script managing the call to present the layout.

Here I've also populated the userCSQ variable I created by simply typing the value "ITS".  Alternatively I could have used the drop down in the values column to pick another variable defined in your script.  I already have a CSQ variable used in the script and if the value there was appropriate for agent view, I could replace "ITS" with CSQ from the drop down.


Then in Finesse Administration on the Call Variables Layouts tab, create a new layout.

In this example it is critical that the name is ITS Layout, the value of the user.layout variable you created and populated in your script.  When the script presents an agent a call, this layout will be used as a result.

Note in the Call Header Layout I have a row with a description of Queue and a value of userCSQ.  As a result, when an agent is presented a call using this layout they will see the word Queue: and the value ITS.  You assigned the userCSQ variable the value of "ITS" in your script's Set Enterprise Call Info step.


Ultimately, now an agent will be presented with a layout like below, and this layout will ONLY be presented when a Set Enterprise Call Info step assigns ITS Layout to the user.layout variable.


Enjoy presenting interesting data!

Thursday, January 03, 2019

Cisco Expressway reset password

Having lost a root or admin password, you can reset them from the vSphere / vCenter console.

  1. Reboot the Expressway with the misplaced password.
  2. When prompted in the vSphere / vCenter console, log in with the username pwrec. You should not be required to enter a password.
  3. Then enter the username that needs the password changed.  This will be root or the name associated with administration (i.e. admin, etc.).
  4. Enter the new password for the account and once again to confirm.
  5. Reboot the system again.
  6. Enjoy  your new password.


Resetting root password on an Expressway Core server